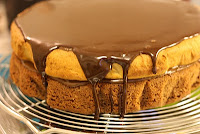
Well, pay attention to this article, it’s a big one that I have been writing all day!
About one month ago, I stumbled upon Cuisin’é’moi layer cake recipe and since I couldn’t get it out of my head! Of course the color alternation seduced me but it’s especially the way you make it which intrigued me the most. All the detailed explanations are available on the Rose & Cook website (another sign pointing me to to try to cook a layer cake? ^^) and it seemed to be accessible so let’s go, added to my to do list of recipes!
So making a layer cake as this one is very simple! You will need to bake 2 different cakes, with preferably well distinctive colors. For example I chose this time a banana cake and a chocolate cake. Then, you will need something to bind the two cakes: a quite big quantity of Nutella in this case. Finally, you will need some ingredients to make a classic glazing on top of it. Concerning the kitchen utensils, just get a good knife and two different sizes containers: bowl, cup, glass… you’ll eventually get something!
Start by cooking the first cake: in my case, I cooked this delicious banana cake. Then you will need:
- 120g room temperature butter
- 140g sugar
- 3tbs unsweetened cacao powder
- 140g flour
- 1 packet of baking powder (or 11g)
To bind
- Some tablespoonful of Nutella (4,5,6… I didn’t count but make sure you get a sizable jar ^^)
For glazing
- 200g black chocolate
- 200g whipping cream
- 10g butter
So let’s continue with the second cake!
While you’re finishing baking the banana cake, prepare the chocolate cake:
Start by mixing well the soft butter with the sugar.
Add the cacao and mix again.
Add the 2 eggs and blend well.
In another bowl, mix the baking powder to the flour. Sieve this dry mixture onto the cacao batter and mix again.
Spread equally the batter into a classic round cake pan. Above all, don’t forget to use the same cake pan used for the first cake!
Bake for 35 minutes in your preheated oven to 180°C and let cool down on a wire rack.
When the two cakes are cooled down, we do the cutting.
So now choose your weapons!
Form two circles with the chosen utensils for each cake.
Turn the cake over and cut a bit once again to help you to untie the circles.
Do exactly the same for the other cake.
Now let’s assemble!
Start by melting the Nutella about 20 seconds into the microwave oven. It will make it more “spreadable”.
Choose a first circle and brush its inside with some Nutella. Add the second circle but from the other cake this time! Brush again and complete with the last small circle (still by alternating cakes).
 |
First little joy when I get to this step ^^ |
Then brush enough spread on the entire surface.
Let’s continue with assembling the last three circles: start by putting down the bigger one and brush its inside with some Nutella. Stick the 2nd circle and brush its inside. And finish with the last circle!
 |
| 2nd little joy^^ |
If you have some Nutella left, you can spread it on top of the cake. Don’t waste ^^
Finally the glazing, last step to put the finishing touches to your cake:
Boil the whipping cream and add 10g of butter. Cut the 200g of chocolate to pieces and pour them into the cream. Let leisurely melt on low heat.
Put your layer cake onto a wire rack. And put all of it onto a container which will save the extra glazing.
When your glazing mixture is homogenous and has slightly cooled down, gently pour some of it onto the cake.
Finish by trying to cover the sides also ^^.
COOKING
No more cooking at this point! The cake will just need 2H into the fridge to be solidified :)
SERVING SUGGESTIONS
What suspense! I was really excited to discover the inside cake for this first test :D
Suspense… ^^
Here you go! Nice color alternation, right ? :) Well, the circle in the middle was obviously too big… I’ll do better next time, I promise :p
You can accompany your piece of cake with a bit of glazing from the extra one, it’s awesome :p
TIPS AND TRICKS
So several little tips:
- Use the same cake pan for both of the cakes. And don’t do as I did, try to not use baking sheets because your cakes won’t have perfect smooth sides. So this time, don’t forget to put some butter and flour into your cake pan. Some more butter into this recipe won’t hurt anyway ^^.
- Another tip, try to have quite the same quantity of ingredients for both of the cakes. We don’t want to get one cake higher than the other, that won’t be nice or useful. Tip that I will follow next time!
- If you don’t find at home what you need, to form the cake circles, you can make some circles with cardboard.
- I would advise you to make the bigger circle thick enough to avoid getting a thin cake piece. It would weaken it and then your piece could be broken. In my case, it was quite weak!
- If you eat the cake some days after, don’t forget to take the cake out of the fridge a few minutes before serving it.
Now you know the secret of this cake! I hope that my explanations were clear enough! Don’t hesitate to ask me questions if you need to and/or leave some comments, I will enjoy it :)
We really enjoyed us, our great neighbors and some friends too ^^.
Suggestions for flavors for my next one? Because I will do it again for sure!
I hope that you will have a go at it and if you will, please send me your photos and your impressions :)
See you soon for more good things!
Rose.


No comments:
Post a Comment